Saturday, 29 June 2013

How to Auto Remove Spam Emails in your Gmail

Auto-Delete Spam Mail
Come on admit this thing that you receive more spam emails than the genuine one’s on your daily basis, normally this has become a trade in online world that people get mails asking them to sign up fro some service fro receiving a bonus of $1,00,000000 whoops how many zero’s have I added, well yes that what the case and all the people who are new to this online email world normally click on those spammy offers and struggle with their hacked account.

So these are nothing but spammers who are just trying to crack down your account to get your precious account credentials, so normally whatever emails you receive in your spam box are identifies as spams as Gmail’s inbuilt filter thinks, so it is always recommended that you should no attempt to open any email you receive in you spam folder.

And it is recommended that you can should delete all those mails to play safe game in future, so now checking everyday that spam folder and deleting those mails is pretty complicated well what if we can make this process automatic and all those mails you receive in your spam folder gets deleted by its own, well obviously this thing has a drawback that if you sometimes receive some important email that will also get into the trash can but still for safe side this process should be attempted.

no-spam-filter[12]
  • Visit Gmail –> Settings –> Filters –> Create New Filter.
  • Now you will see a dialog asking you to identify what kind of mails should be filtered out before it gets delivered to your inbox.
  • Well now just add in:spam in the “Has the Words” dialog, and press Create New Filer, now you might see a popup, just press OK.
  • Now your New Filter is created just choose the options what you would like to do with those emails.
  • Well you can do many things like forwarding those emails to some cyber expert fro analysis by adding his address or if you wanna delete it just tick the Delete It option and mark Also Apply this Filter.
  • Now your filter is created and every email you receive in your Spam Folder will be deleted automatically.
So now there is not need to manually visit that Spam Folder and delete those ugly mails, you can anytime remove this filter by visiting your filters tab in Gmail settings :)


Migrate From Blogger To WordPress Without Losing SEO !

If you are currently using Blogger and are considering a move to WordPress, you can migrate your blog fairly quickly and easily. There is really nothing wrong with the platform in and of itself but if you’re interested in taking your blog to the next level, especially if it relates to monetizing it, customizing it, you should probably look to move your blog to WordPress.

You may be thinking that moving from Blogger to WordPress may cause some problem to all your old permalinks (URLs), search traffic, Google PageRank (SEO) and RSS subscribers.
But you don’t have to worry about these issues. You can safely migrate any blog from Blogger to WordPress without losing your SEO or RSS Subscribers or URLs.

How to Switch from Blogger to WordPress

Getting Started

The first step in the migration process is to install and configure WordPress. There are three ways to get a WordPress blog.
  • The first is to download the WordPress software from WordPress.org.
  • You can even sign up for an account that’s hosted at WordPress.com.
  • If your Web hosting company supports it, the other way is to automatically install WordPress using your Web account’s control panel and a Web application like Fantastico or SimpleScripts.
Once you have your WordPress blog up and running, you can begin the migration.The steps involved in the migration differ depending on how you are hosting your previous blog. There are two different ways :-
  • Migrate from Blogger’s servers i.e Blog with a subdomain address – e.g. http://example.blogspot.com
  • Migrate from your own Web site i.e Blog with a Domain address – e.g http://blogger.com
At this point, I assume you have that :
  1. Your blog is on Blogger.com with Custom Domain Setup
  2. You have a web-hosting where you can install WordPress
  3. You have access to your domain’s DNS records.
  4. Configure Permalinks on New WordPress
Login to your WordPress admin panel and  go to Settings -> Permalinks and select Custom Structure option and paste the following value next to it and save changes.

/%year%/%monthnum%/%postname%.html.
permalink setting

This will make your WordPress blog’s permalink structure looks like Blogger.com blog. Do not use any other permalink structure at this time.

Import Content from Blogger to WordPress

Now its time to import your content from Blogger to WordPress. From the WordPress Dashboard, go to Tools >> Import >> Blogger as shown below:

Import
Now you  will be asked to download and install the Blogger to WordPress Impoter Plugin.
Description
If for some reason you can’t install this plugin directly through your interface you’ll have to download it manually and  upload it manually to your Plugins folder.
Next you need to do the Authorization Process between your WordPress-powered blog and your old Blogger account.
Import BloggerOn clicking Authorize you will be asked to enter your e-mail id and password. Fill all the required fields and you will proceed to new screen where you will be asked to Grant Access to create secure connection between your Blogger blog to your new WordPress blog.

Grant Access

Once you grant access, you will be taken back to the Blogger importer on WordPress where you will be able to see a list of Blogger Blogs. Click on the Import Button and  it will import your entire Blogger blog to WordPress.

Blogger Blog - Import

If you have more than one author in Blogger.com blog, you may need to click on add users on your WordPress blog. After creating users in WordPress hit Save Changes.

Author Mapping


At this point your Blogger.com is completely imported. But remember you are not done till yet.

Update Blogger Info for SEO

Now you have to do some work in your old Blogger blog to make sure you capture all SEO juice. To do so you need to change few things in your account and settings. There is a little code involve in it but that’s not too difficult.

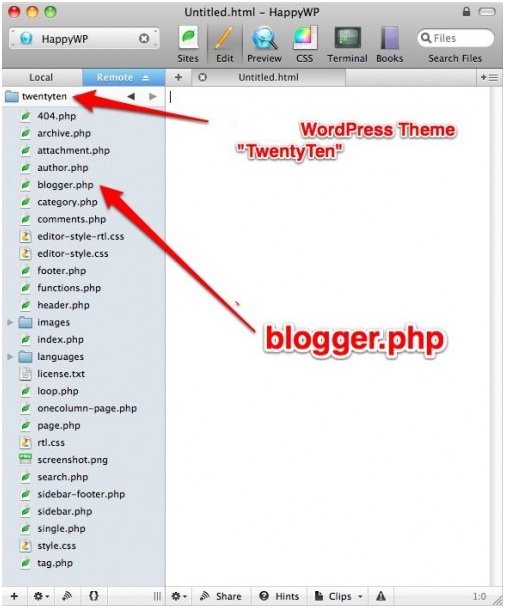
Create you need to create Blogger.php file using some text editor (notepad) with following code in it.
[cc]
/*
Template Name: Blogger
*/

global $wpdb;
$old_url = $_GET['q'];

if ($old_url != "") {
$permalink = explode("blogspot.com", $old_url);

$q = "SELECT guid FROM $wpdb->posts LEFT JOIN $wpdb->postmeta “.
“ON ($wpdb->posts.ID = $wpdb->postmeta.post_id) WHERE “.
“$wpdb->postmeta.meta_key=’blogger_permalink’ AND “.
“$wpdb->postmeta.meta_value=’$permalink[1]‘”;

$new_url = $wpdb->get_var($q)? $wpdb->get_var($q) : “/”;

header (“HTTP/1.1 301 Moved Permanently”);
header(“Location: $new_url”);
}
?>
[/cc]
The next is to Upload this file into your current WordPress Theme folder by using either cPanel or FTP software.

PHP

Further you need to create a Page in WordPress called Blogger.  Go to Page >> Add new page and choose the Template called Blogger in the Page Attribute area in the right side. After you are done publish the page.

Add New Page

Now go to your Blogger admin panel. Click on Design on right side and head into Edit HTML area. Click on the link that says “Revert Widget Templates to default”.

Revert

You will see a new Edit HTML screen with some piece of code written in it. Copy and paste the following code replacing all the previously written code. Make sure that you change http://www.blogger.com with your new and current domain name.
<!DOCTYPE html PUBLIC "-//W3C//DTD XHTML 1.0 Strict//EN" "http://www.w3.org/TR/xhtml1/DTD/xhtml1-strict.dtd">
<html xmlns="http://www.w3.org/1999/xhtml" xml:lang="en" lang="en" dir="<$BlogLanguageDirection$>">
<head>
<title><$BlogPageTitle$></title>
<script type="text/javascript">
<MainOrArchivePage>
window.location.href='http://blogger.com/'
</MainOrArchivePage>
<Blogger><ItemPage>
window.location.href='http://blogger.com/blogger/?q=<$BlogItemPermalinkURL$>'
</ItemPage></Blogger>
</script>
<MainPage><link rel="canonical" href="http://blogger.com/" /></MainPage>
<Blogger><ItemPage>
<link rel="canonical" href="http://blogger.com/blogger/?q=<$BlogItemPermalinkURL$>" />
</ItemPage></Blogger>
</head><body>
<div style="border:#ccc 1px solid; background:#eee; padding:20px; margin:80px;">
<p>This page has moved to a new address.</p>
<h1>
<MainOrArchivePage><a href="http://blogger.com"><$BlogTitle$></a></MainOrArchivePage>
<Blogger><ItemPage>
<a href="http://blogger.com/blogger/?q=<$BlogItemPermalinkURL$>"><$BlogItemTitle$></a>
</ItemPage></Blogger>
</h1>
</div>
</body>
</html>
<!-- replace blogger.com with your WordPress site URL --->
Click on the Save Template Changes and guess what you are done. Essentially what this is doing is redirecting all traffic, requests, and links to your new WordPress blog.

Update RSS Feed

When you move your Blogger to WordPress the address of your feeds will also be changed. To redirect your Blogger Feed to WordPress :-
Go to Blogger >> Settings >> Site Feed >> Custom Feed >> and write your new WordPress feed address, and now your old feeds will automatically shift to your new WordPress feeds.
You should also consider using FeedBurner for your WordPress feeds.
Now that your new WordPress site is up and running with all the old Blogger posts, here are a few important things you should do:
  • When you migrate from Blogger to WordPress, all your pictures images hosted on Blogger / Picasa Web Albums will not get imported into WordPress. Therefore never delete your old blogger blog as it will break images that are now embedded in your WordPress posts.
  • Let everyone know that you’ve moved! Make the last post you do on Blogger an “Announcement” type post sharing with people the news of the migration.

Free Tools That Will Simplify Your Social Media Efforts


Print

Online reputation has become a decisive factor in the success of any blogger, entrepreneur or business. One of your greatest personal and professional assets is without a doubt your online status, so if you think that you can ever make a career without the help of social media, you are very wrong.
Think about it this way, if you have a business, the only way to help it grow, is to make it known. Brick-and-mortar shops require a lot of time to build a loyal community, and even though they offer an excellent service, the vast majority of customers might never hear of them if they are not given the chance. Furthermore, I can assure you that every person who will ever interview you for a job, will also look you up on Google. It is inevitable.

Social media  platforms have become excellent business promoters and reputation accelerators, but sometimes we simply do not have the time to take care of our accounts. It can become very confusing to tackle with Google+, Twitter and Facebook accounts, and this is exactly the reason why you should consider making use of certain tools. This nifty gadgets will make sure that your online reputation remains intact, and that you will also get a chance to sleep and disconnect. Here are a few tools that will help you effectively organize your social media efforts.

1. HootSuite

1. HootSuite

HootSuite is an excellent tool for monitoring and planning your activity on Twitter. Not only does it monitor search words on Twitter, but it also allows you to take advantage of the peak tweeting hours. In other words, it will help you tweet in the moments were the chances of being re-tweeted, or noticed, are the highest. In addition, HootSuite will also give you access to other social media platforms like Facebook, LinkedIn and Myspace. This handy dashboard has a sleek and simple interface, that can be used even by the newbie tweeter. Social media marketing may not be in your DNA, but it seems that dashboards like HootSuite have done a great job in simplifying the efforts of newbies.

2. Technnorati

2. Technorati

I am a blogger, and after blogging for many years, I have realized that it is essential to keep an eye open to how people perceive your work. In this sense, Technorati is an excellent tool which will enable you to monitor the people who are mentioning your posts, articles or blog on different mediums. If data analysis is one of your passions, then Technorati will not disappoint. It comes equipped with amazing statistics and ranking data that will help you better understand how your blog is doing.

3. Social Mention

3. SocialMention

Social Mention is a superb tool to have around, especially if you are extremely active on the internet. It has the possibility of collecting data from a myriad of online mediums. As a result you will receive many useful statistics that will help you perfect your strategy. It can be connected to over 100 social media platforms, simply by downloading the search bar and activating it on your browser. Notifications related to anything that might interest you will start arriving in your e-mail.

In conclusion, there are many platforms that can help you monitor your online activity, and if you want to spare yourself the trouble of having to go through all the notifications manually, you will install them. Not only will they help you spare valuable time, but they can also help you be online, even if you are actually away from the computer.

Five WordPress Plugins You Should Definitely be Using

Wordpress is without a shadow of a doubt one of the most efficient, free, website builders on the world wide web. The reason why it is so sought after is probably because it is also the one that can be best optimized. Developers have made great efforts to add templates,  and themes which can be optimized up to 90%. The user-friendly dashboard, and incredible plugins which can be found online can significantly improve your SEO performance, and as a result, help you attract more readers. In the end, it is all about the way you rank in the results page if you wish to drive organic traffic to your page. Let’s take a look at some of the most useful plugins for WordPress.

httpwww.makingdifferent.com

1. Google XML Sitemap

The plugin Google XML Sitemap is extremely useful, especially if you have a lot of content posted on your site. Moreover, instead of using Google Analytics to use the sitemap tool, you can make use of it directly from WordPress. It is easier, faster, and more efficient. With the help of Google XML Sitemap, visitors will be able to find any blog post with ease.

2. Googlyzer

Content writing and marketing aren’t the only things that bloggers should be concerned about. As a matter of fact, many writers forget to monitor their data, and this is one of the deadly sins of blogging. You should know that an essential part of your strategy is pulling data from certain elements of your Google Analytics tool. The Googlyzer plugin can be added to your content management system on WordPress. By adding it you will be able to see what kind of traffic is coming to your blog, and how your SEO is impacting the overall performance of your site.

3. Zemanta

Zemanta may not be the best plugin to be found online, but it still offers many benefits. The most useful thing I have found about it is the fact that it enables you to easily add Amazon affiliate links. Basically, you can add your amazon id to Zemanta, and according to your keyword phrases, the plugin will help you create relevant affiliate links. Another nifty feature is the ability to add related articles from your site and also from other sites. Although there has been a lot of heated debate on the subject of linking out with the help of Zemanta, I believe that it can be a winning strategy. Google likes it when sites link to other relevant sites, because it is like a vote of confidence.

4. Yoast WordPress SEO

According to recent discussions, Yoast for WordPress SEO is one of the most efficient plugins at the moment. It enables you to use a whole host of SEO tools directly on your blog, so if you are a newbie, things will become a whole lot easier. The optimization plugin integrated in the software will help you chose focused keywords, and also monitor how many times you have used it, how many times it appears in URLs, titles, pictures and so on.

5. Majestic SEO

Majestic SEO is without a doubt one of the most powerful SEO tools at the moment. There is actually a dashboard widget for Majestic SEO which will show you your entire back-link data. This is great because it will enable you to get rid of bad links, and also monitor your outreach on other sites.
There are many plugins for WordPress available at the moment, and it the end it all comes down to taste. What you like, what best suits your needs, and what it is that you want to do with your blog. Most of them are free, so why not experiment a little?

How Facebook and Twitter are Useful for Online Business Owners


ask_business_facebook_twitter

Mark zukerberg and his classmates got an idea without knowing the truth that one day more and more people will be registered with facebook, creating it strong and influential social interface. It is a medium by which friends has a contact with their friends through videos, shared photographs, ideas, their interested applications, games and so on. Marketing on facebook is effective and it is also inexpensive method of advertising. Anyone can create pages for the business and focus the customers in any city and country by paying some charges. These excellent features are adding value to the regime of facebook.

On the other hand twitter a few years younger is also gaining the fruits of higher development daily. Twitter is the micro blogging site and it is one of the top ten visited websites of the earth. This wonderful masterpiece was designed by Dorsey back in the year 2006 and from that day it was able to make millions of active users. People text message of about 140 words and create their ideas visible to the world. It is getting famous among the international organizations for the marketing purposes because of its diverse visitors. It is becoming much better daily through offering privacy to its users. Personalizing the background theme is impressive and distinguishing feature of twitter which facebook does not offer to its users.

As plenty of cell phone users in the developing countries get prepared to graduate from 3G to 4G, live support service on the mobile phones is quickly spreading like a standard communication matrix between consumers online and people provide live support service on the sites. Through accessing the cell phones of their desired business sites, website visitors and customers online are today able to surf through a different range of goods and services. Most of these websites provide consumer support service to their clients communities by dedicated chat software technology that contain mobile capability. If you have latest technology mobile phones but not implemented a live support service, this is right time to consider this protocol.

Best quality dedicated online chat applications that are mobile enabled featured to work in two ways. They do it possible for consumer to engage in online chat straightly from the mobile phones. The user interface that pops up if a chat icon is chosen is configured particularly to work on the mobile phones therefore giving a actual time connection between customers and chat operators. An internet featured mobile phones is your live chat consultants want to respond to the consumers chat queries.

Your chat operators can handle multiple chats, transfer chats at the same time and even make chat transcripts from your palm conveniently. If you are running a small business and always find that you want to give chat service to your clients when you are away from your office or home, online chat software application that is mobile featured is a real blessing for you. Live chat refers to all types of communication over the internet. Anyone can chat with consumers, friends and business partners availing mobile phones.


Friday, 28 June 2013

5 Best Tips To Increase Your Facebook Fanpage Likes !


Facebook-like

I have shared many tips and tricks on facebook in my older post, if you are new here then must check, well today i want to share some tips that i already used for increasing my facebook fan page likes, i got 500+ likes in 1 week, and now 20-30% traffic is form facebook as well, so you have created a facebook fan page but couldn’t get fans/likes? then do not worry about it, here is best 5 tips for you that you can increase your facebook fan page likes as well, so all tips are different and will 100% work for you, but you need to follow it with care, you thought i will tell you to post fresh content, share images instead of text, Run contests or use Facebook Adverts? then you are wrong :D  i have another 5 tips instead of that all things.. so what for waiting?

(1)Automatically Increase Your Fan Page Likes Using  jQuery

Yes ! in my prevues post i have published a post on how to increase your facebook fan page likes automatically using jQuery, you need just add jQuery code into your blogger blog, with this script applied any unique visitor who comes to your page can become your fan. He just needs to click anywhere on the webpage as a small invisible like button will follow his mouse cursor and as soon he clicks anywhere he will be liking your fan page. so Try it now!

(2) Invite Your Friends To Like Your Page

The best chance of getting a response is to send a notification directly to your friends asking for support of your page via “like”.
So, Go to your facebook fan page–>click on Build Audience drop down menu–>there is many option available in build audience first “Invite E-mail Contacts”  Second option “invite your friends” Third “Share page, so you can use any option as you like to invite your friend to like your page, second one is the best option that will send your to friends a notification to like your page, build audience also allowed you to create an ad on facebook to gain page attention and likes.

1

(3) Add Facebook Like Box To Your Blog/Website

In my older post i shared many facebook widgets for blogger, you can use it easily, Facebook like box allows your readers to like your fanpage easily and they don’t need to find you manually. facebook developers have made this very easy to integrate a facebook like box in your blog by adding a few lines of code in it, so, simply visit the facebook developers page there you will see the like box generator then Customize the look and feel, height, width of your Like box from as you need, Once you are done with the customization, click on Get code. It would pop-up a window, then copy the iframe code and paste in your blog HTML/JavaScript widget and save it. that’s it.

(4) Add Facebook Like Button To End of post in Blog/Website

Put Facebook Like Button after the content of the article in your website or blog, so that when a user has finished reading your post, they notice the Like button immediately and Hit it. Visit the facebook developers page to get facebook like button code. and simply go to blogger–>edit html, CTRL+F to find </data:post.body> paste the like button code just above it and save your template now like button will show at ending of all post of your blog.

(5) Promote Your Fan Page On Other Top Pages

Yes, i also tried it, my one of friend have facebook page with 4 lac+ Indian fans/Likes, i just told him to share my page on their page, then i got many likes for my other page, so, this is last and best 5th tip, do promote your page in other pages, if you can’t find any top pages for promoting your fan page then contact me. i’ll help for it. :)


How To Enable Post Tagging Approval In Facebook?

Enable Post Tagging Approval Facebook
Facebook is being one of the most popular social networking platform which is being used by billions of users. Facebook helps people in connecting with their friends, relatives, loved ones and who ever they want to contact. Some people also make the friends online out of their country and some of them build the relationships online. Facebook is also very strict in privacy now a days. The new user have to pass many security steps. Well, we’ve a good news for those who are getting irritated by being tagged in irrelevant posts. Now they can review or approve the each and every post in which they will be tagged and after the approval that post will appear in their timeline. They can also delete or hide the post which they don’t want to add in their profile. This is the fantastic feature introduced some days ago which will help the Facebook users to make the privacy even better. As I’ve told you that Facebook is being strict in privacy and soon the high security will be done for better usage. Well, Those who want to enable post tagging approval in their account can simply follow the below given steps for doing this and we’re also going to teach you that how can we approve or disapprove any post. So friends let’s begin the tutorial.

Also Read:- Facebook poke will make you insecure

Enabling Post Tagging Approval

Go To Facebook >> Login To Your Account >> Your Timeline
At The Right Bottom Side Of Cover Picture There will be some buttons. Just click the settings drop down button menu and Go to Timeline Settings

1

Now here you’re on the timeline setting page. On the top you will see “Who can add things to my timeline?” and in that section second option is about enabling post tagging approval. So just click the edit button on that option. See the screenshot below
2

After that you will see the Disabled button. It means that post tagging approval in disabled so just click it and hit the enable button.

3

Now you’ve successfully enabled the post tagging approval. So now let’s jump to next step.

Approve Or Delete Posts In Which You’ll Be Tagged

So you’re already logged in to your Facebook account. In order to approve or delete any post in which you’ll be tagged, just go to your profile and click on “Activity Log” button.

4

Now you’re in activity log and in the sidebar you’ve to go to “Timeline Review”.

5

There all the pending approval posts will be stored. Just click “Add To Timeline” To approve and “Hide” to delete.

6

That’s All.
Need Help?
So friends how was the tutorial ? I hope this is helpful for those who are getting irritated by this like me. This really feels bad but now we’ve got the rid of this. If you’re facing any problem in learning this and feel free to ask in the comments. We’ll reply you back soon and also get connected with us for more handsome tips. Take Care! Good Bye!

Facebook poke will make you insecure


Poke

In my previous posts i shared many tips and tricks on facebook, if you are new here then must check out it, Well today we will discuss on the what is poke in facebook and how it will make you insecure, A “Poke” is basically someone trying to get your attention and another example the meaningless features that are used just to simple pranks someone, when you poke someone then they will get a poke notification on their facebook home page, the poke feature can be used for a variety of things on facebook, for example, you can poke your friend to say “Hello”.

What happens when you poke someone?, if you poke someone not in your network/friends list and they poke back, then you can view their profile even if you are not on their friends list, when you allow someone to see your profile in facebook for 3 days, so they can know about you like who are you and hopefully add you as a friend,

Once you delete a poke from your facebook page, you can’t get it back but you can still poke back, after removing a poke also allow the other person to poke you again, You can only poke who’s in your friends/confirmed friend or also you can poke to your friend of friends. then same your friend or friends of friend can poke you but make sure about that what is meaning of poke back.

So, now you get this then please share it with your friends that can they know the correct meaning. :)

39 Internet Sites Hosting Obscene Content to be blocked: DoT

According to the orders by Department of Telecommunications, Internet service providers have been asked to block 39 websites immediately that host and allow users to share obscene content.

In April 2013, court issued notices to ministries of Information and Technology, Information and Broadcasting and Home Affairs, and Internet Service Providers seeking to bring an anti-pornography law in the wake of a petition filed by Indore-based Advocate. The petition said that that absence of Internet laws in India encourage people to watch obscene videos. Watching obscene videos is not an offence but it is one of the major causes for crime against women, highlights the filed petition. It further added that over 20 crore such videos or clippings are freely available in the market, which are being directly downloaded through the Internet or accessed via video CDs.

Reacting to the development, an official of Ministry of Communications and IT said: “We have just followed a court order and asked internet service providers to comply with it.” According to the president of Internet Service Providers Association of India, “Effective way of blocking as per DoT’s directive is to block the content at origin by respective data centre or content owner if content is hosted in country… if content is hosted outside India, then it should be blocked at international gateway of cable landing stations.”

An Internet service provider (ISP) is an entity that offers users’ access to the Internet and related services. Recently, ISPs were accused for allegedly breaching the privacy of internet users through unauthorized sharing of their personal data with US intelligence agencies. As per reports, US-based nine internet companies, operating in India through agreements signed with Indian users, shared 6.3 billion information/data with National Security Agency of USA without express consent of the Indian users.

Reliance Communications to Offer iPhone 5 in India Starting Today


Reliance iPhone 5
Reliance iPhone 5 tariff details:
Reliance Communications today announced it will offer iPhone 5 in India starting today. iPhone 5 will be available for a suggested retail price of Rs 45,500 for the 16GB model, Rs52,500 for the 32GB model and Rs59,500 for the 64GB model in Reliance World outlets. In addition, iPhone 4S will be available for Rs38,500 for the 16GB model and iPhone 4 will be available for Rs26,500 for the 8GB model. Reliance Communications will allow iPhone 5 customers to connect to its fast, reliable & superior 3G network with data speeds up to 21 Mbps.

Plan
PLAN 1
PLAN 2
PLAN 3
PLAN 4
Monthly fee (In Rs.)
304
504
804
1,004
Voice minutes(all local min)
100
200
400
500
SMS
 –
 –
 –
 –
Data (MB)
2,048
3,072
6,144
10,240
iPhone 5 (16 GB) – Rs.
45,500
45,500
45,500
45,500
iPhone 5 (32 GB) – Rs.
52,500
52,500
52,500
52,500
iPhone 5 (64 GB) – Rs
59,500
59,500
59,500
59,500
iPhone 4S (16 GB) – Rs.
38,500
38,500
38,500
38,500
iPhone 4 (8 GB) – Rs.
26,500
26,500
26,500
26,500

MTS Rolled out EVDO/HSD in 51 Towns in Kerala

After expanding the high speed network across Rajasthan and Tamilnadu, MTS India, the telecom brand of Sistema Shyam Teleservices Ltd has expanding its high speed MBlaze network across Kerala circle in 51 new towns.

Newly added HSD towns include Manjeswar, Neeleswaram, Thrikaripur, Cheruvannur, Koodaranji, Mavoor, Kadavalur, Nilambur, Cherpulacherry, Shoranur, Yakkara, Nemmara, Parli, Vandithavalam, Athnai, Chelakkara, Engandiyur, Kallur, Nayarangadi, Puthenpeedika, Talikkulam, Mathilakam, Kadikkad, Perumpilavu, Angamaly, Edathala, Kadungalloor, Kothamangalam, Kurumasseri, Peppathi, Pezhakkappilly, Valakam, Kaduthuruthy, Kidangoor, Thengana, Thrikkodithanam, Eramallur, Muhamma, Nedumudi, Thuravoor, Chathannur, Chavara, Mayyanad, Thevalakkara, Valakam, Kattakkada, Perumathura, Pothencode, Varkala, Vattapara, Kunjithanny. With the latest expansion MTS now has more than 130 towns in Kerala with EVDO/HSD network coverage.

According to Radhakrishnan KV, Chief Operating Officer Kerala Circle, MTS India, “MTS is focused on expanding its high speed data network across the country. As a part of the same endeavor, I am proud to announce the launch of MBlaze services in 51 new towns in Kerala. This latest expansion will enable MTS data customers to experience state-of-the-art high speed data services including Live TV and Games-on-Demand”. Adding further, Radhakrishnan said, “MTS has over 66,500 data customers across Kerala and with further expansion in our HSD footprint in the state, we expect to add many more customers in the next few months”.